Setting up your NVIDIA environment without suffering.
Reduce your suffering setting up your NVIDIA drivers on Linux.
Confidence: likely
Updated on 02.09.2022 due to a change of NVIDIA’s public key.
Updated on 09.03.2021 to include warning about ‘Secure Boot’.
Updated on 02.02.2021 for ISAAC 2020.2
Your NVIDIA Environment
Let’s say you just heard about NVIDIA Isaac and you are excited to test it out. You went to the setup documentation first and found:
To avoid potential issues caused by mismatching library versions, we recommend using CUDA 10.2, CUDNN 8.0.3, and TensorRT 7.1.3, which are the versions available in Jetpack.
This is a very important step to take whenever you need to use any tool: check the recommended environment setup. Do not assume that the latest version of everything is the go-to solution.
Now we know that we need:
- CUDA 10.2
- cudNN 8.0.3
- TensorRT 7.1.3
This is for Isaac, but even for Deep Learning you would need to have CUDA, cudNN, and TensorRT. We will explain why those tools are needed in this post.
The setup is done on an MSI GS66 Stealth with an NVIDIA RTX 2070.
The updated setup (ISAAC 2020.2) uses an MSI GS66 with an NVIDIA RTX 2080.
Prerequisites
- Ubuntu 18.04
- A good internet connection (We will download ~5GB)
- Patience
At some point in time, we were all like Brian.

This blog post will ease out the burden of setting up your environment and show you clear steps to take. Let’s dive directly into it.
Before going into copy pasting commands and hoping for things to work out, we need to understand why we are installing those “tools” on our system.
Before proceeding, you may have to disable ‘Secure Boot’ in your BIOS to avoid issues with installed drivers.
CUDA
What is CUDA
“CUDA is a parallel computing platform and programming model that makes using a GPU for general purpose computing simple and elegant.” -NVIDIA Blog
What does that even mean?
It means that having CUDA on your PC will allow you to use the CUDA extensions and libraries (which is part of the CUDA toolkit) for the programming language you are using (ex: C++), to specify which parts of your code should be parallelized and how. This parallelization is possible thanks to the GPU’s architecture. You can check out this fun experiment by Mythbusters painting the Mona Lisa in milliseconds in a “GPU way”.
If, in our case, we need CUDA to take advantage of this parallelization on the GPU, why not any other parallel computing platform? CUDA is the official platform provided by NVIDIA for NVIDIA GPUs and supports other low-level APIs like OpenCL.
Installation
In our case we need CUDA version 10.2, but what if later on we want to use this same tutorial to install CUDA 11?
You should be able to find out where to get CUDA from instead of copying commands which will work for the current needed versions.
This blog will show you where to look for the tools we will be installing.
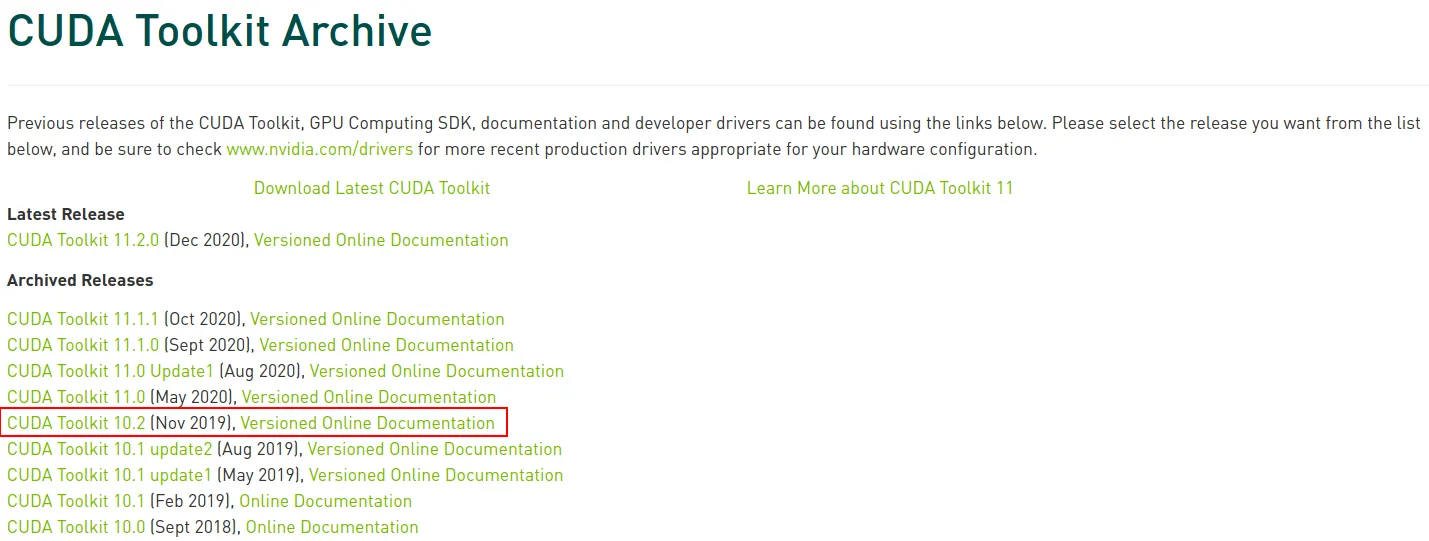
You can find all CUDA releases by checking the CUDA Toolkit Archive In our case, we click on the link for CUDA 10.2 (November 2019).
We are redirected to a page where we can choose the OS, our PC’s architecture, the OS distribution, OS version, and installer type.
We will choose Linux, x86_64, Ubuntu, 18.04, deb(network) as shown in this image.

deb means debian package. Ubuntu is built on top of Debian GNU/Linux. A debian package is the installer file used by Debian Linux and all its derivatives (Including Ubuntu).
(network) means that we will let the package download all additional data through the network (internet connection). This explains why the file is ~3KB only.
Run the following commands to download relevant files and start the installation
wget https://developer.download.nvidia.com/compute/cuda/repos/ubuntu1804/x86_64/cuda-ubuntu1804.pinsudo mv cuda-ubuntu1804.pin /etc/apt/preferences.d/cuda-repository-pin-600sudo apt-key adv --fetch-keys https://developer.download.nvidia.com/compute/cuda/repos/ubuntu1804/x86_64/3bf863cc.pubsudo add-apt-repository "deb https://developer.download.nvidia.com/compute/cuda/repos/ubuntu1804/x86_64/ /"sudo apt-get updatesudo apt-get install cuda-10.2Notice that the last command includes the version we want to install 10.2. If we were to install version 11.0 we would download the relevant files and on this last step install cuda-11.0. Choosing cuda-10.2 will download both the cuda-toolkit and the relevant drivers.
To point your system to where cuda is installed, we will add the relevant environment variables to the end of our .bashrc file.
export PATH=/usr/local/cuda/bin${PATH:+:${PATH}}
export LD_LIBRARY_PATH=/usr/local/cuda/lib64${LD_LIBRARY_PATH:+:${LD_LIBRARY_PATH}}
Just as a good practice, reboot your PC after installing/upgrading new drivers.
Verify Installation
After rebooting, we need to check that CUDA 10.2 was actually installed. This is done by running nvcc -V
nvcc -Vnvcc: NVIDIA (R) Cuda compiler driver
Copyright (c) 2005-2019 NVIDIA Corporation
Built on Wed_Oct_23_19:24:38_PDT_2019
Cuda compilation tools, release 10.2, V10.2.89We see that CUDA release 10.2 is installed, with an exact version V10.2.89
Having the installed packages/drivers is one thing, having usable installed packages/drivers is another.
Usually the code samples are disregarded when installing new software.
I personally always download them for 2 main reasons:
- Check that the installation is successful by running the samples.
- Learn about multiple ways the library can be used. It helps in being a playground for the first experiments.
Samples are directly downloaded by following the previous steps.
To compile and use them:
cp -r /usr/local/cuda/samples/ ~/cuda-10_samplescd ~/cuda-10_samplesmakeFinished building CUDA samplesYou may get an error like the following:
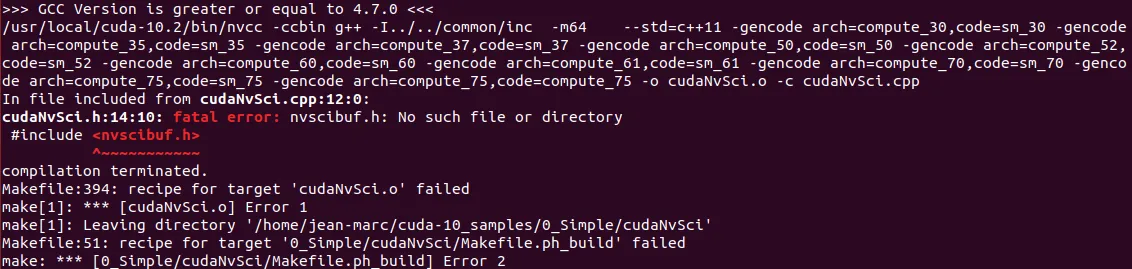
This can be safely skipped by running:
make -kThis is a know issue in CUDA 10.2 which was not yet solved.
Once built, we try to run one of the examples:
cd ~/cuda-10_samples/bin/x86_64/linux/release
./BlackScholes
...
Test passedIf your tests also passed (hopefully), you can keep going.
If the drivers are installed, the system should be able to see our GPUs, right?
We can call the NVIDIA System Management Interface (nvidia-smi) to check for the available NVIDIA interfaces.
nvidia-smi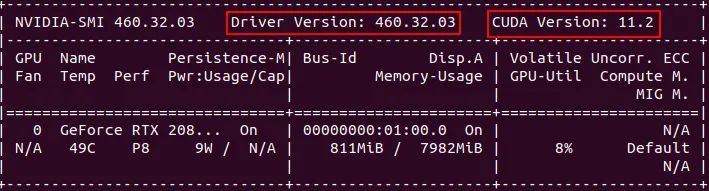
There is one weird info here. We installed CUDA 10.2, but nvidia-smi is showing CUDA 11.2, why?
Even when we check the installation location
jean-marc@MSI-GS66:~$ ll /usr/local/
total 44
drwxr-xr-x 11 root root 4096 Jan 29 15:21 ./
drwxr-xr-x 12 root root 4096 Jan 29 17:18 ../
drwxr-xr-x  2 root root 4096 Jan 29 17:24 bin/
lrwxrwxrwx  1 root root    9 Jan 29 15:21 cuda -> cuda-10.2/
drwxr-xr-x 16 root root 4096 Jan 29 14:30 cuda-10.2/
drwxr-xr-x  2 root root 4096 Aug  7 00:34 etc/
drwxr-xr-x  2 root root 4096 Aug  7 00:34 games/
drwxr-xr-x  2 root root 4096 Aug  7 00:34 include/
drwxr-xr-x  5 root root 4096 Jan 29 17:24 lib/
lrwxrwxrwx  1 root root    9 Nov 23 06:04 man -> share/man/
drwxr-xr-x  2 root root 4096 Aug  7 00:34 sbin/
drwxr-xr-x  7 root root 4096 Jan 29 17:19 share/
drwxr-xr-x  2 root root 4096 Aug  7 00:34 src/
We see that only cuda-10.2 is installed, and cuda is a symlink (shortcut) for the cuda-10.2 folder.
It turns out there is a difference between the “GPU CUDA” and the “runtime CUDA”.
The CUDA driver API is a low-level API. The CUDA runtime API is a higher-level API that is implemented on top of the CUDA driver API.
You usually use the CUDA runtime API in your code.
The CUDA driver API is installed during the installation of CUDA drivers. The CUDA runtime API is installed during the installation of the CUDA Toolkit.
As long as your CUDA driver API has a version equal to or higher than the CUDA runtime API, you should be good to go with no expected conflicts.
You can check this great answer on stackoverflow by Robert Crovella, an NVIDIA employee, explaining the difference.
Some details can also be found in the CUDA docs
Once CUDA Toolkit and CUDA Drivers are installed by following the previous steps, we can see our GPUs and the installation seems OK, we can move on to installaing cudNN.
cudNN
What is cudNN
“The NVIDIA CUDA Deep Neural Network library (cuDNN) is a GPU-accelerated library of primitives for deep neural networks. cuDNN provides highly tuned implementations for standard routines such as forward and backward convolution, pooling, normalization, and activation layers.” - NVIDIA cudNN page
This means that cudNN has highly optimized implementations for common operations used in your applications. We said that the CUDA runtime API can help you leverage GPU parallelization. cudNN can help you use pre-defined functions which are already optimized and using the CUDA runtime API so you don’t have to implement them from scratch.
Installation
You need an NVIDIA Developer account for this stage
As we did for CUDA, we will access the cudNN Archive to select the version we need.
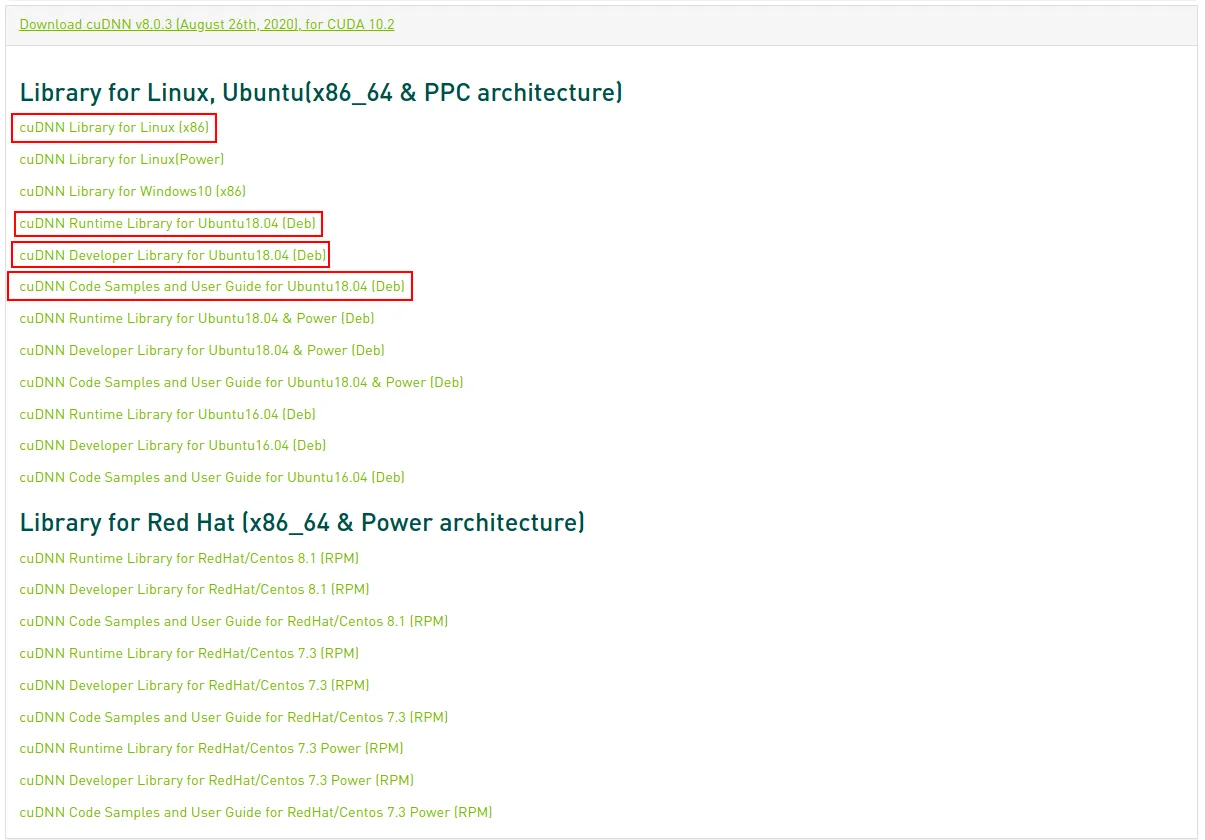
We will download cudNN Library for Linux, and the Code Samples to test our installation. The cudnn-runtime and cudnn-dev packages are also needed.
Once the cudNN tar file and samples are downloaded, navigate to the download directory and follow the subsequent steps:
To install cudNN:
Unzip the cuDNN package. x is just a placeholder, choose the correct file downloaded.
tar -xzvf cudnn-x.x-linux-x64-v8.x.x.x.tgzCopy the following files into the CUDA Toolkit directory, and change the file permissions.
sudo cp cuda/include/cudnn*.h /usr/local/cuda/include
sudo cp cuda/lib64/libcudnn* /usr/local/cuda/lib64
sudo chmod a+r /usr/local/cuda/include/cudnn*.h /usr/local/cuda/lib64/libcudnn*
Install the cudnn-runtime and cudnn-dev deb packages
sudo dpkg -i libcudnn8_8.0.3.33-1+cuda10.2_amd64.deb
sudo dpkg -i libcudnn8-dev_8.0.3.33-1+cuda10.2_amd64.deb
To install the samples:
sudo dpkg -i libcudnn8-samples_8.0.3.33-1+cuda10.2_amd64.debVerify Installation
We can check the installed version of cudNN
cat /usr/include/cudnn_version.h | grep CUDNN_MAJOR -A 2#define CUDNN_MAJOR 8
#define CUDNN_MINOR 0
#define CUDNN_PATCHLEVEL 3
--
#define CUDNN_VERSION (CUDNN_MAJOR * 1000 + CUDNN_MINOR * 100 + CUDNN_PATCHLEVEL)
#endif /* CUDNN_VERSION_H */This shows that we have cudNN major version 8, minor version 0, patch version 3, which is the cudNN 8.0.3.
To verify that cuDNN is installed and running properly, compile the mnistCUDNN sample located in the /usr/src/cudnn_samples_v8 directory.
Copy the cuDNN sample to a writable path.
cp -r /usr/src/cudnn_samples_v8/ $HOMEGo to the writable path.
cd $HOME/cudnn_samples_v8/mnistCUDNNCompile the mnistCUDNN sample.
make clean && makeRun the mnistCUDNN sample.
./mnistCUDNN...
Test passed!If cuDNN is properly installed and running on your Linux system, you will see a message similar to the following: Test passed!
With CUDA and cudNN installed, we still have TensorRT.
TensorRT
What is TensorRT
“The core of NVIDIA TensorRT is a C++ library that facilitates high performance inference on NVIDIA graphics processing units (GPUs). TensorRT takes a trained network, which consists of a network definition and a set of trained parameters, and produces a highly optimized runtime engine which performs inference for that network. TensorRT provides API’s via C++ and Python that help to express deep learning models via the Network Definition API or load a pre-defined model via the parsers that allows TensorRT to optimize and run them on an NVIDIA GPU. TensorRT applies graph optimizations, layer fusion, among other optimizations, while also finding the fastest implementation of that model leveraging a diverse collection of highly optimized kernels. TensorRT also supplies a runtime that you can use to execute this network on all of NVIDIA’s GPU’s from the Kepler generation onwards. TensorRT also includes optional high speed mixed precision capabilities introduced in the Tegra X1, and extended with the Pascal, Volta, and Turing architectures.” -NVIDIA Docs
What does that even mean?
Well, this means that TensorRT helps inference of your trained neural networks be much faster. TensorRT will use highly optimized cudNN functions with some additional tricks given your network, to allow a faster inference on NVIDIA GPUs while also using Tensor cores.
Installation
You need an NVIDIA Developer account for this stage
We can choose the TensorRT version we need by following this link, in our case TensorRT 7.
Then we choose the correct TensorRT version for our CUDA version 10.2.
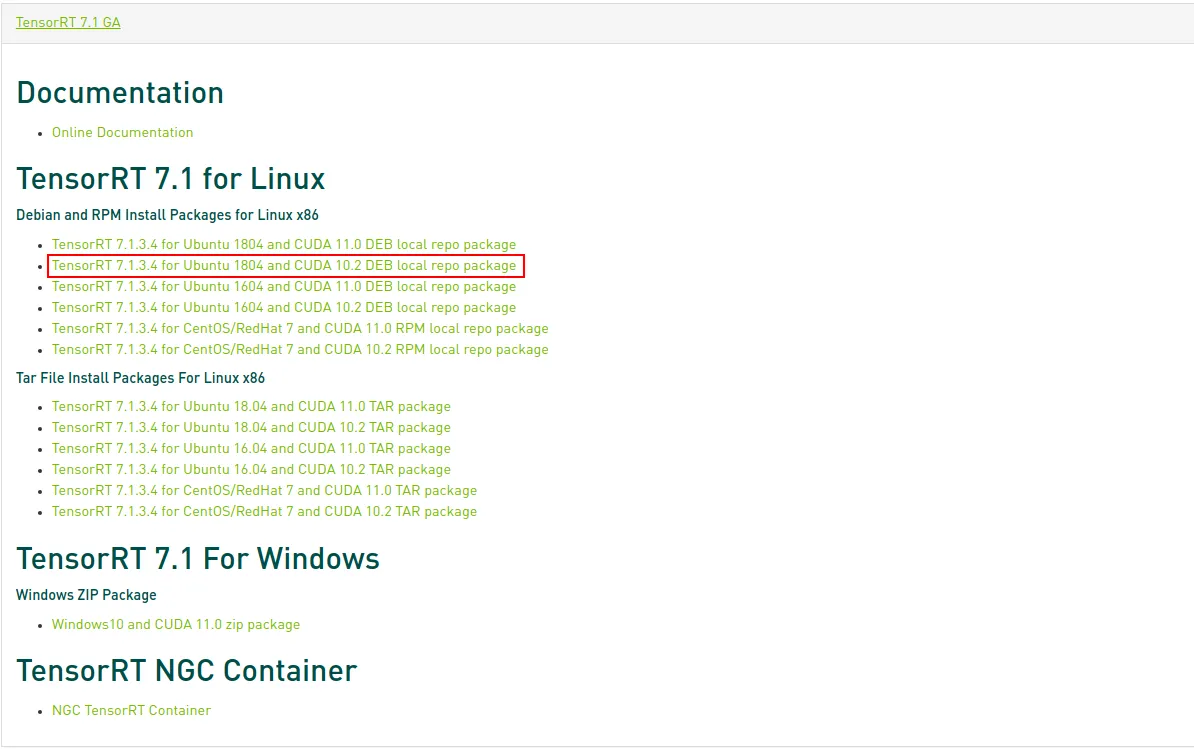
To install TensorRT:
sudo dpkg -i nv-tensorrt-repo-ubuntu1x04-cudax.x-trt7.x.x.x-ga-yyyymmdd_1-1_amd64.debsudo apt-key add /var/nv-tensorrt-repo-cudax.x-trt7.x.x.x-ga-yyyymmdd/7fa2af80.pubsudo apt-get updatesudo apt-get install tensorrtWe will consider that you may use TensorRT from python2.7 and python3, just in case you face applications still using older versions of Python.
To install additional packages:
For Python2.7
sudo apt-get install python-libnvinfer-devFor Python3
sudo apt-get install python3-libnvinfer-devFor additional TensorFlow support
sudo apt-get install uff-converter-tfVerify Installation
We can check if the packages are correctly installed
dpkg -l | grep nvinferYour output should be similar (not necessarly the same) as this

Let’s run the TensorRT samples to make sure our installation is successful and usable.
Copy the TensorRT sample to a writable path. (Missing this step would give you a permission error)
cp -r /usr/src/tensorrt/ $HOME/tensorrt-samplesGo to the sampleMNIST example.
cd $HOME/tensorrt-samples/samples/sampleMNISTCompile it.
makeBefore running our MNIST example, let’s download some data for inference. The provided download_pgms.py script uses python3 and the libraries pillow and numpy First we install the libraries and needed tools.
To install python packages, you need Package Installer for Python (pip) to be installed. To install pip for python3
sudo apt install python3-pip python3-devTo install the packages using pip
python3 -m pip install numpy pillowWe need to install curl, a very powerful tool to transfer data using various network protocols, to download the sample dataset.
sudo apt install curlSecond, we download and extract the data needed from Yann LeCun’s website.
cd $HOME/tensorrt-samples/data/mnistcurl http://yann.lecun.com/exdb/mnist/train-images-idx3-ubyte.gz -o train-images-idx3-ubyte.gzgunzip train-images-idx3-ubyte.gzcurl http://yann.lecun.com/exdb/mnist/train-labels-idx1-ubyte.gz -o train-labels-idx1-ubyte.gzgunzip train-labels-idx1-ubyte.gzThird, we run the data download script
python3 download_pgms.pyFinally, we run the MNIST sample.
cd $HOME/tensorrt-samples/bin && ./sample_mnist&&&& RUNNING TensorRT.sample_mnist # ./sample_mnist
[08/21/2020-10:51:14] [I] Building and running a GPU inference engine for MNIST
[08/21/2020-10:51:15] [I] [TRT] Detected 1 inputs and 1 output network tensors.
[08/21/2020-10:51:15] [I] Input:
@@@@@@@@@@@@@@@@@@@@@@@@@@@@
@@@@@@@@@@@@@@@@@@@@@@@@@@@@
@@@@@@@@@@@@@@@@@@@@@@@@@@@@
@@@@@@@@@@@@@@@@@@@@@@@@@@@@
@@@@@@@@@@@@@@@@@@@@@@@@@@@@
@@@@@@@@@@@@@@@@@@@@@@@@@@@@
@@@@@@@@@@@@@@@@@@@@@@@@@@@@
@@@@@@@@@@@@@@#=. +*=#@@@@@@@
@@@@@@@@@@@* :. -@@@@@@@
@@@@@@@@@@# :#@@: +@@@@@@@
@@@@@@@@@* :@@@* .@@@@@@@@
@@@@@@@@= =@@@@. *@@@@@@@@
@@@@@@@= -@@@@* =@@@@@@@@@
@@@@@@@ -@@@%: -@@@@@@@@@@
@@@@@@% %%+: *@@@@@@@@@@
@@@@@@@ .. @@@@@@@@@@@
@@@@@@@# .=%%: =@@@@@@@@@@@
@@@@@@@@@@@@@# +@@@@@@@@@@@
@@@@@@@@@@@@@# @@@@@@@@@@@@
@@@@@@@@@@@@@@ @@@@@@@@@@@@
@@@@@@@@@@@@@# @@@@@@@@@@@@
@@@@@@@@@@@@@+ @@@@@@@@@@@@
@@@@@@@@@@@@@% @@@@@@@@@@@@
@@@@@@@@@@@@@@. #@@@@@@@@@@@
@@@@@@@@@@@@@@* :%@@@@@@@@@@
@@@@@@@@@@@@@@@: -@@@@@@@@@@
@@@@@@@@@@@@@@@@= %@@@@@@@@@
@@@@@@@@@@@@@@@@@@@@@@@@@@@@
[08/21/2020-10:51:15] [I] Output:
0:
1:
2:
3:
4:
5:
6:
7:
8:
9: **********
&&&& PASSED TensorRT.sample_mnist # ./sample_mnistIt is alive! Given a picture of a 9, we were able to predict that it is the actual digit 9 (** next to the 9). You may have different numbers, the important part is seeing “PASSED” with a similar output to this one.
Conclusion
Congratulations! Your system is now ready to be used for many applications which leverage your NVIDIA GPU. If you are interested in CUDA, cudNN, and TensorRT, you have the samples ready to use!
References
Make sure to check the version of the documentation. Sometimes it points to the latest version only and it may not be compatible with the version you need!